• If you are new to GiantScaleNews.com, please register, introduce yourself, and make yourself at home.

    We're 1st in Giant Scale RC because we've got the best membership on the internet! Take a look around and don't forget to register to get all of the benefits of GSN membership!

    Welcome!

IMAC Double Build, Carden Pro 124" Extra 300 40%

thurmma

150cc
I am not taking credit for this.

Please do not give me credit,

this is from Tom Wheeler:

Here is the real trick in applying Ultracote over Ultracote or MonoKote that I have been using for building over 300 aircraft for customers and myself in the past 20 years.
Here is what I use, Ultracote as the top layer, heat gun, spray bottle with soapy water, and a squeegee about 3”x3” made out of 3/32” balsa (use the grain vertical to the film surface).
Like when using MonoKote as the top layer, you “float” the film on top of the base film, but unlike MonoKote instead of using Windex that has an ammonia base you use a spray bottle with water and a very small amount of dish soap in it. The technique once you have the base film covering on the model is to spray that finish with the soapy water, place the Ultracoat piece that is already cut to size and shape in position. Use the balsa squeegee you made to get the bulk of the soapy water out, now comes the trick, while working the water out with the squeegee, use the heat gun first at a fairly good distance and slowly move it in closer as you squeegee the water out. What happens with Ultracote that while you are working the air bubbles out the adhesive begins to activate and you will be able to tell when the Ultracote is fully adhered to the surface. This technique is easy and fast and you are done with each added piece now, and you can move on to the next.
I use both MonoKote and Ultracote, and this soap process only works with Ultracote, for MonoKote I use Windex and wait till the next day and go over the edges to make sure it sealed.
Tom

@GSNadmin this needs to be a sticky somewhere so we can find it later when we need it :) I will be using it this winter I am sure of it while creating a new IMAC master piece :)
 
Same to you all! You all have a happy thanksgiving !

OK, all wings are done now (Check)
All stabs are done (check)

Rudder is done (check)


now it is all minutia.....


DOn't even know what to do next?

Should i cover the wings and stabs?

I have found my two schemes!

This will be the scheme for the airplane with the DA 150L

image-1.jpg
image.jpg
image-2.jpg


and this will be the scheme for the airplane with the DA 200:

carden pro scheme 5.png
carden pro scheme 3.jpg
carden pro scheme 2.jpg
carden pro scheme 1.png
carden pro scheme 4.png


Wish me luck in doing this....


best regards to all!
 

Rusty 73

100cc
I prefer the red and blue design , just cutting and placing the design will take a lot of patience .
The orange design will stand out very will , Best of Luck and happy thanksgiving .
 
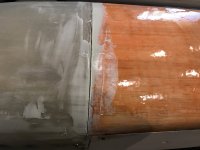
this part of the build never is pretty, and it is really all prep-work to attempt to obtain the best paint finish possible.

The hatch area that has been glassed, is now placed next to the cowl, and I check the gap, as well as inspect for a step off. Invariably, there will be a step off.

IMG_2726.JPG
IMG_2727.JPG


this step off is minimal, but, if it can be improved, why not?

SO, what I have done is suffer this joint area some, and then applied the pol-U dolphin glaze.

IMG_2729.JPG

before it cures, I pass a sharp blade thru several time! DO not want those two surfaces bonding!


Last step, once it cures, is to sand it smooth....

IMG_2730.JPG


IMG_2731.JPG


step off is gone now. Now, to do the other airplane.
 

Attachments

  • IMG_2728.JPG
    IMG_2728.JPG
    243.2 KB · Views: 246

tl3

50cc
... Invariably, there will be a step off.
Hi Cam,
Looking good. Fwiw, I always leave fitting the cowl rings into the cowl, and mounting the cowl until after the hatch is completed (up through glassing and finish sanding). That way you can massage the cowl rings so that the cowl perfectly aligns with the hatch and there is never a need to use filler to correct for misalignment.
t
 
Last edited:
Good advice Ty. I had done as you said up til right before the glassing step. but even then it appears to be a problem with the sanding I did on the front of the hatch. No matter what, there would have been a step off there, very minimal. Probably, could have been left alone, and no one would have noticed it, unless it was a builder!! ;)
 
Top