• If you are new to GiantScaleNews.com, please register, introduce yourself, and make yourself at home.

    We're 1st in Giant Scale RC because we've got the best membership on the internet! Take a look around and don't forget to register to get all of the benefits of GSN membership!

    Welcome!

Sport JTEC RADIOWAVE 26% Pitts Model 12

pawnshopmike

Staff member
Using my crystal ball, (which I stole off a blind one legged hooker for a dollar) I was able to catch a glimps of the future. Here's the first know pic of Stang flying the Pitts!

image.jpg
 

stangflyer

I like 'em "BIG"!
Quick update everyone. I got started on placing the canopy last night. Was pretty well whipped out so I didn't get a chance to post the photos and info. Will get them posted this evening.
 

stangflyer

I like 'em "BIG"!
Hey everyone. Had a little dinner and the "rat" doggie is fed so I guess I will take a minute to update the progress on the Pitts. Last night I started placing the canopy for fit and final mounting. Before doing so, I had a few decisions to make. First off being the pilot bust. As earlier mentioned, I wrote Francisco regarding the G-Force pilots. He responded like the very next day. Very nice fellow however his response was a little disappointing. It seems the production of G-Force pilot busts have pretty much come to a stop. Only temporarily guys, so not to worry. Francisco stated he stopped production on the original design so that he could focus on the new version of G-Force pilot busts. The new version, (not yet available) will be more life like than the previous and with all new vibrant and exciting colors. Sooo....I am on the list for a couple. For now though, the Pitts will maiden without a pilot. No point in putting one in that I will be swapping out in a few months. This development taken into consideration, I decided to mount the canopy and will worry about installing the pilot at a later time.

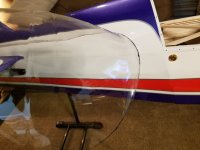
The other consideration I needed to think about was the actual fit. I didn't want it to look as though it was just "slapped" on the frame work. Also, because it is not the "actual" canopy for 26% Pitts, I had to take into consideration how I would mount the canopy and get it to fit over the rear canopy support. As some of you are aware, the canopy included with the kit is for the 35% Pitts. It is not exactly a perfect fit, but close enough that with a little modification, it will fit just fine.

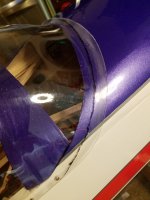
I had already "pre" cut the canopy for a rough fit. It fit ok, but needed a little refinement. I chose to use some very "VERY" tiny Phillips head machine screws to give it a more authentic look as in the full scale.

feature.jpg


I placed the canopy into position then carefully measured out the exact locations I want the screws to be. Once I was satisfied with the fit, I drilled the holes for the screws in the framework.

20170302_222803.jpg


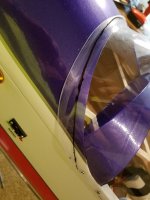
Once the initial holes were drilled, I re-fit the canopy to check alignment. I also didn't like the curvature of the front of the windscreen so I decided to do a little more trimming on it. I want it to fit as close and flush as possible. Plus I want to be able to add the screws all the way around to keep it uniform and so it will look right. I removed the canopy once again and hardened the holes with thin ca. Now keep in mind that adding the screws were meant mostly for "look". However they will definitely add extra strength to keep the canopy in place. Once I am absolutely 100% satisfied with fit, I will remove the canopy one last time, scuff the inside of the rail lines and add RC 56 canopy glue. Then screw and tape the canopy back into place to cure. My plan is also to scuff the outside perimeter of the canopy so that I can mask off that area and paint it to match the rest of the scheme. Of course I will remove the screws once the canopy glue has cured then paint the border. I don't want to paint the screws as I think it will look very cool with them as they are.

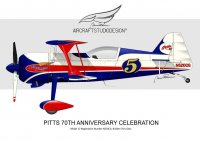
Pitts Scheme.jpg

So here are a few more photos of my progress. I am far from done and definitely not completely satisfied yet. But it is getting there.

20170302_214337.jpg 20170302_214347.jpg 20170302_222844.jpg
20170302_211721.jpg
20170302_211728.jpg
20170302_211749.jpg
20170302_212315.jpg
20170302_212322.jpg
20170302_224429.jpg
20170302_230721.jpg


I may add (8) more machine screws around the front edge of the windscreen area. I want it to look authentic and I am having a very difficult time locating photos of that area. I may also cover over the front lip of the windscreen as I did with all my other planes. Only problem with that would be I would have to peel back the hatch covering and cut a new piece to fit the right way. Maybe the paint will be enough.

I am also still undecided about painting the frame work over the front of the canopy. For the twin seater, this would definitely be painted in. I can't decide if it would add to or subtract from the looks of the plane on the whole. You can see that molded in frame on the canopy in the last photo.

I will probably do more work on the canopy/hatch tomorrow. I'd like to get it completed so I can focus on painting the cowl.

So what do you think everyone? Any suggestions or thoughts? Something you all may have ideas on? Perhaps @Wacobipe or @Maxwell1945 will chime in and show me so me close ups of their canopies?
 
Last edited:

Bipeguy03

150cc
Hey everyone. Had a little dinner and the "rat" doggie is fed so I guess I will take a minute to update the progress on the Pitts. Last night I started placing the canopy for fit and final mounting. Before doing so, I had a few decisions to make. First off being the pilot bust. As earlier mentioned, I wrote Francisco regarding the G-Force pilots. He responded like the very next day. Very nice fellow however his response was a little disappointing. It seems the production of G-Force pilot busts have pretty much come to a stop. Only temporarily guys, so not to worry. Francisco stated he stopped production on the original design so that he could focus on the new version of G-Force pilot busts. The new version, (not yet available) will be more life like than the previous and with all new vibrant and exciting colors. Sooo....I am on the list for a couple. For now though, the Pitts will maiden without a pilot. No point in putting one in that I will be swapping out in a few months. This development taken into consideration, I decided to mount the canopy and will worry about installing the pilot at a later time.

The other consideration I needed to think about was the actual fit. I didn't want it to look as though it was just "slapped" on the frame work. Also, because it is not the "actual" canopy for 26% Pitts, I had to take into consideration how I would mount the canopy and get it to fit over the rear canopy support. As some of you are aware, the canopy included with the kit is for the 35% Pitts. It is not exactly a perfect fit, but close enough that with a little modification, it will fit just fine.

I had already "pre" cut the canopy for a rough fit. It fit ok, but needed a little refinement. I chose to use some very "VERY" tiny Phillips head machine screws to give it a more authentic look as in the full scale.

View attachment 94010

I placed the canopy into position then carefully measured out the exact locations I want the screws to be. Once I was satisfied with the fit, I drilled the holes for the screws in the framework.

View attachment 94011

Once the initial holes were drilled, I re-fit the canopy to check alignment. I also didn't like the curvature of the front of the windscreen so I decided to do a little more trimming on it. I want it to fit as close and flush as possible. Plus I want to be able to add the screws all the way around to keep it uniform and so it will look right. I removed the canopy once again and hardened the holes with thin ca. Now keep in mind that adding the screws were meant mostly for "look". However they will definitely add extra strength to keep the canopy in place. Once I am absolutely 100% satisfied with fit, I will remove the canopy one last time, scuff the inside of the rail lines and add RC 56 canopy glue. Then screw and tape the canopy back into place to cure. My plan is also to scuff the outside perimeter of the canopy so that I can mask off that area and paint it to match the rest of the scheme. Of course I will remove the screws once the canopy glue has cured then paint the border. I don't want to paint the screws as I think it will look very cool with them as they are.

View attachment 94054

So here are a few more photos of my progress. I am far from done and definitely not completely satisfied yet. But it is getting there.

View attachment 94032 View attachment 94033 View attachment 94034 View attachment 94035 View attachment 94041 View attachment 94042 View attachment 94043 View attachment 94044 View attachment 94046 View attachment 94047

I may add (8) more machine screws around the front edge of the windscreen area. I want it to look authentic and I am having a very difficult time locating photos of that area. I may also cover over the front lip of the windscreen as I did with all my other planes. Only problem with that would be I would have to peel back the hatch covering and cut a new piece to fit the right way. Maybe the paint will be enough.

I am also still undecided about painting the frame work over the front of the canopy. For the twin seater, this would definitely be painted in. I can't decide if it would add to or subtract from the looks of the plane on the whole. You can see that molded in frame on the canopy in the last photo.

I will probably do more work on the canopy/hatch tomorrow. I'd like to get it completed so I can focus on painting the cowl.

So what do you think everyone? Any suggestions or thoughts? Something you all may have ideas on? Perhaps @Wacobipe or @Maxwell1945 will chime in and show me so me close ups of their canopies?

Really nice!! I always like it when guys pay attention to the details when finishing a plane. Things like those tiny screws and a nice interment panel just make the whole airplane look better.

Top notch work!
 

stangflyer

I like 'em "BIG"!
Really nice!! I always like it when guys pay attention to the details when finishing a plane. Things like those tiny screws and a nice interment panel just make the whole airplane look better.

Top notch work!
Thank you. Hardly as top notch as your attention to detail with your builds. But I'll take it. LOL
 
Top