• If you are new to GiantScaleNews.com, please register, introduce yourself, and make yourself at home.

    We're 1st in Giant Scale RC because we've got the best membership on the internet! Take a look around and don't forget to register to get all of the benefits of GSN membership!

    Welcome!

IMAC Pattern - Cadence w/ DA 35

jtec/radiowave

70cc twin V2
Hey Paul,

Dealing with some major back issues. Kev got married and moved to IN, left me here all alone (well except for our employees ) I have been cutting alot of kits out. Getting ready to release a couple more shortly

Hope your doing ok. Kids keeping you from getting some serious building time in?

Let me know what you need. we'll get you taken care of. Aactually Kevin still helps but I get to do all the MANUAL labor now!! LOL

Al
 

Alky6

150cc
Thanks Al! Sounds like you've got some better living through chemistry in the works there. ;) Hope you feel better soon! Back problems are the worst.

Kids keeping me very busy, but at 12 and 13 they are a ton of fun!!

Will try to catch up with you on the phone soon, that is if you're not out running a machine. Damn Kids! hahaha
 

Alky6

150cc
Picked up a major block of foam today. 1#/cu.ft. Nominal denisity. Virgin EPS. 116# for a 98”x41”x51” block. Used a 4x8 sheet of OSB on the floor with some 1/8” x 1.5” aluminum strips screwed to a couple of 48” x 24” sawn sheets of osb (they sit vertically on top of the 4’x8’ sheet of plywood). The aluminum bar extends below the sheet and indicates at the front edge of the full sheet. This is how I keep everything square for foam cutting slabs off. Got a 7” slab and a couple of 3” slabs cut off so I can start making parts. My buddy @Rcscudder just built a badass homebuilt CNC and he is going to cut my foam templates out of aluminum for me! Woohoo.

9D034205-7330-44EE-B6C9-C32208B6E525.jpeg
FA92EB15-7A3C-4153-85E1-AB01F5515962.jpeg
E0E23292-0968-451F-8A11-7C5ECCA98E1E.jpeg
DB1D3421-9132-49D0-BD74-2674242298CF.jpeg
26B18C3F-A6FC-4E26-9791-9373AE8F0805.jpeg
AF153BB0-C1C4-4084-A2B0-A225FD9A445A.jpeg
 

Snoopy1

640cc Uber Pimp
Picked up a major block of foam today. 1#/cu.ft. Nominal denisity. Virgin EPS. 116# for a 98”x41”x51” block. Used a 4x8 sheet of OSB on the floor with some 1/8” x 1.5” aluminum strips screwed to a couple of 48” x 24” sawn sheets of osb (they sit vertically on top of the 4’x8’ sheet of plywood). The aluminum bar extends below the sheet and indicates at the front edge of the full sheet. This is how I keep everything square for foam cutting slabs off. Got a 7” slab and a couple of 3” slabs cut off so I can start making parts. My buddy @Rcscudder just built a badass homebuilt CNC and he is going to cut my foam templates out of aluminum for me! Woohoo.

View attachment 110604 View attachment 110605 View attachment 110606 View attachment 110607 View attachment 110608 View attachment 110609
Wow great job man you have enough foam for a life time you are lucky to live 2400 miles from me I would be at your door step in minutes trying to steel one slab of foam off you. Great job.
 

Alky6

150cc
Thanks Snoopy. Sometimes I wish we all lived a little closer so we could go and steal from each other. Hahaha. Then again, we might not be as efficient — too busy watching everyone else build!
 

Alky6

150cc
Of course! I enjoy watching what ya’ll keep doing. I would be so busy watching (in person) that I wouldn’t get anything done! :mario-banana:
 

Alky6

150cc
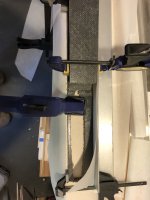
Got some more work done on the Cadence. Glued the tail pieces to the fuse to support the horizontal stab. Butt joined them.
The process is shown below for the left side.

Right side glued in.
37187138-0D36-45FC-9E3B-FD1C4EFB51BC.jpeg


Trim back some of the honey comb core on each side.

5E0B254C-765C-4858-BABF-8C21F7EF13DF.jpeg


More trimming

195DEFF5-84D8-42B0-8BF4-81BA83814F75.jpeg


Add some mashed potato consistency epoxy.

9013094F-5979-41B8-837A-4FCE5F1CCDD5.jpeg


F2D557F2-9FD7-43CF-8812-96DD733801CB.jpeg


Push ends together to let epoxy mush out.

CE42D2A2-263E-4843-920A-363B6284FD95.jpeg


Clean off excess using a scraper and finish with acetone rag. Makes life easier later. No sanding.

5FE10034-9F73-49EB-90AA-C433937B77DF.jpeg


Clamp in place. Normally I would add the inner layer of fiberglass cloth over the joint, but no room with the clamp, so will have to add that step later.

DBA611C3-0DC1-43C6-A5A5-5CB569D85143.jpeg
 

Attachments

  • 164196C5-E479-4C98-9E0F-ADB743AE46ED.jpeg
    164196C5-E479-4C98-9E0F-ADB743AE46ED.jpeg
    1.4 MB · Views: 792
Top