• If you are new to GiantScaleNews.com, please register, introduce yourself, and make yourself at home.

    We're 1st in Giant Scale RC because we've got the best membership on the internet! Take a look around and don't forget to register to get all of the benefits of GSN membership!

    Welcome!

3D Splitting Cowls made easy

Ohio AV8TOR

Just Do It
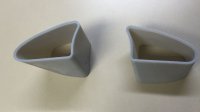
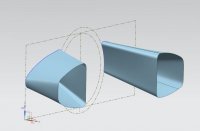
So I am getting close to that spot on my 91" Extra build that I need to think about if I am going to split my cowl or not. Right now I am unsure of the baffles. I have drawn up in CAD unique baffles that blend from the inlet to the exact size of the cylinder. Looking straight in from the front last night much of the cylinder is below the inlet line requiring the blend to blend down as you can see from the pictures below. I am going to print these in RP. So with baffles like this is it best to simply bond this to the lower half only or split the baffles as well having a top and bottom half.

baffle.JPG baffle2.JPG
 
Last edited:

Ohio AV8TOR

Just Do It
Another question I just thought of regarding the necessary cutout on the left side cowl for the plug cap. Should this be done before making the split line?
 

sweetpea

100cc
I would split the baffles as well. The cap shouldn't make a difference unless you are making it so tight around the cap that any small difference from the split wouldn't make it fit anymore.
 

Ohio AV8TOR

Just Do It
These are at 0.100" thick and both weigh 70g. No question the fiberglass will be lighter. To be honest I don't know how thin I can actually make the baffle. This is not a wax based RP system so parts are on par with ABS strength. So I could leave it 0.100" at the bonding area and thin in half the rest of the way to basically cut the weight in half. As these are a first off I have several things to check. I can change the build parameters and print a solid of the inside and use this as a plug to layup fiberglass.
 

Terryscustom

640cc Uber Pimp
On the 91" Extra I would suggest to split the cowl, join it back together with the lip and masking tape, THEN cut the plug hole with a template like standard cowl cutting process. Then install blind nuts and mounting blocks. The cap on that cowl only sticks out a little but needs to be long to clear the cable so you make a template, tape it to the side of the fuse, remove the plug cap, install cowl and then transfer the marks to the cowl.
 
Top