• If you are new to GiantScaleNews.com, please register, introduce yourself, and make yourself at home.

    We're 1st in Giant Scale RC because we've got the best membership on the internet! Take a look around and don't forget to register to get all of the benefits of GSN membership!

    Welcome!

IMAC Double Build, Carden Pro 124" Extra 300 40%

Rusty 73

100cc
@Rusty 73

-0.5 Farenhiet, man, I would be under 5 blankets and waiting for summer! No way I could live there. You all are tough!

Tough I guess just climatized to this , got the heat at 22c /73f and tucked under a silk duvet along with my Chihuahua who is my personal heater on cold nights . Been living here my whole life it's something at we just deal with , burrrr cold then three months of warmth summer or flying season !!!!!

You did a great job laying down those patterns on the wing , love the design and your quick ..
 
Just installed the CDI for the airplane with the twin...

IMG_2935.JPG


This is a unique mount. Very light weight, and it has a double surface. the top surface, where the CDI is strapped to, is attached to the bottom plate, using 4 rubber tubes. I have never used them before, but I imagine, It will help dampen the vibrations to the CDI. I do not trust the rubber tubes, so I passed a small zip tie thru it. Just in case, now it cannot come apart! LOL!! I am OCD!
 
Been working on the baffle plate for the airplane with the quad motor all morning. Still working on it! LOL!! A real PITA.

Meanwhile, I installed the CDI as well as the servo pushrod for the throttle.

I am using a New to ME pushrod, which I have never used before on a 40%er. But, I have used similar many times on airplanes back in the day, nitro airplanes, that were now, to me, small, but back then, were huge!

It is this Sullivan "High stress rod", which is the largest I have ever used and it is quite stout!
sullivan-high-stress-rod-36-suls517.jpg


It allows me to use 4-40 pushrods that threads into the yellow inner tube. then, the yellow fits into the black sleeve, and thus, the pushrod.
I have never used one of these before on a 40%, and in all my other 40%, I have always used a direct pushrod for the throttle servo, and the throttle servo was always very near to the motor and the headers. This past year, on my Dalton Yak, I had a situation whereby we were flying in the summer heat, it was a very hot day, and then all of a sudden, we lost throttle control. When the airplane landed, the throttle servo would not work. Then , 30 minutes later, it started to work again, and I did change out the servo, but I wonder if maybe it had just gotten too hot.

SO on both of these, I will place the throttle servo away from the heat.

I have not committed yet, but I was considering installing the throttle servo in the rear bay, for another reason, which is, to help distribute the weight, since this airplane will want to be nose heavy. I am hoping to place the radio, the batteries and this servo in the rear bay, and use a heavier pilot, to help improve the balance of the airplane. And avoid having to install the batteries way back. right now, with the canopy on, and the cowl on, but no wings, if I raise the airplane from the wing tube, it is way nose heavy.


I installed both CDI, and I also want to try to keep the spark plug cables as well protected as possible, and as well as isolated. Trying to keep these cables as far away from other cables or wiring is important. Too many times, I have seen airplane set up, where they bunch them all together, and I just do not trust that. Again, I am OCD.
IMG_2936.JPG


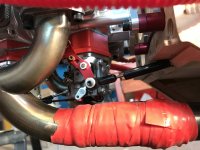
here is the throttle pushrod set up.


I am using a 4-40 screw into the DA throttle arm, and there is blue LOCTITE as well as a locknut behind the screw and monster ball link for a 4-40 screw.


IMG_2937.JPG


here it is with WOT.
IMG_2939.JPG


As I mentioned, I have not committed yet, but considering installing the servo somewhere around here. This area is behind the wing tube, and behind the fuel tank.
IMG_2940.JPG
 

Attachments

  • IMG_2938.JPG
    IMG_2938.JPG
    240.5 KB · Views: 191

Rusty 73

100cc
Where did you get those ignition mounts , i love how is floating above the bottom mount looks like a secraft type.
I don't think it overkill putting the zip ties through the hole of the rubber grommet it's a secondary backup it if something breaks, makes sense to me.

The sulluvian HD gold rod is alot like the nyrod type we used in Nitro days. They expanded with the heat from the sun so the trim was always different between flights.

Love the idea of spreading out the servos and flight packs so they aren't all packed together. Again you've been very busy WoW
 
Here we go, took me long enough to do. Finally installed the throttle servo and the linkage! Whew!! this was a difficult task to do. I had to manufacture those plywood L's. They are edge glued, then the joint was covered with thinner ply. Then I pinned both sides of the thicker ply with the other, using a 1/8" dowel!

IMG_2950.JPG
IMG_2949.JPG
IMG_2948.JPG
IMG_2947.JPG
IMG_2942.JPG
 
The Central Box 400 is installed inside fuselage #1.

I have just installed the 1st of the two 2.4 Ghz receivers / antennas.

This is a neat antenna mount from 3DRC Hobbies, thanks to Kelly Payne.

IMG_2980.JPG


this balsa base is then installed inside the fuselage.

IMG_2981.JPG


the tips of the two yellow 2.4 GhZ antennas need to be at 90 degrees to each other (orthogonal).

the other set of 2.4 Ghz antennas need to be in a different plane to this 1st set of antennas.
 

Rusty 73

100cc
That gives it a nice clean professional look , I saw these M.A.D. fab retainers before they are now on my parts order list .
Looks good Cam ..
 
Thank you Rusty, I also just now installed the servo arms on the rudder servos and also tightened the header bolts and wired the bolts. I had to drill the M5 bolts to accept a safety wire. A real PITA!

I have made my own push rods. They are 6-32 rods, fully threaded, and then i glued on the carbon fiber tubes, tightened lock nuts on both ends, and now, bullet proof!

IMG_2985.JPG
IMG_2984.JPG
 
Top