You are using an out of date browser. It may not display this or other websites correctly.
You should upgrade or use an alternative browser.
You should upgrade or use an alternative browser.
Pilot 40% 330 Recover and Build
- Thread starter stangflyer
- Start date
Snoopy1
640cc Uber Pimp
I have done a little monocote over Ultracote and that is not to difficult to do but Ultracote over Ultracote is difficult and hard not to, get tiny little bubbles all over.Excellent idea and one I would be tuned in to.
I have done Ultracote over Ultracote and it was a challenge, but came out successful. I generally put Monocote over ultracote, but at the time I simply could not find the color I wanted except in Ultracote.
Also I would like to know how you guys re-shrink your ultracote that has had graphics put over it?
stangflyer
I like 'em "BIG"!
Must say I like that. Can you give a decryption how you go about putting one colour over the other and not getting air trapped in between. You are using Ultracote.
Excellent idea and one I would be tuned in to.
I have done Ultracote over Ultracote and it was a challenge, but came out successful. I generally put Monocote over ultracote, but at the time I simply could not find the color I wanted except in Ultracote.
Also I would like to know how you guys re-shrink your ultracote that has had graphics put over it?
Looking super Rob. You will probably have it flying by the time I get my Pilot 330 fuse in. Why does it take so long to get Pilot stuff? ugh.
I have done a little monocote over Ultracote and that is not to difficult to do but Ultracote over Ultracote is difficult and hard not to, get tiny little bubbles all over.
Thanks guys. It is coming along.., not real quick, but steady all the same. To answer your questions on how "I" do it, is not a problem. I probably defer from the way others do it. But I have found that I have my own method and it works for me. I'll try to explain my approach and what I do "after" the fact of covering.
I really like Ultracoat much better than Monokote for a variety of reasons. Back in the day, Mono is all my son and I used. I guess it was because it is what pretty much everyone used. And well, it was there. So... yeah. Fast forward however, when I started really working with the Ultra, I found it to be so much more forgiving than Mono. Then of course they went and changed the adhesive formula and that really messed me up. I find that Ultra goes around compound corners much better and you can warm it to give you an almost "stretchable" material to work with. Which for me, makes things so much easier. Another thing I like is the fact that when applied correctly, you don't have to pull your corners taught and then seal it down as it seems to be with Mono. You can just start in the middle and work it out to your edges, seal it down....trim it off and shrink it. Putting one color over another is actually pretty easy for me. I know some guys use the one or two drops of dish soap in the water trick. Some even use the Windex. I can't say I like either method. Biggest thing to remember when putting Ultra over Ultra... make sure your "base" color is down good and stretched. No sags, no wrinkles, no creases. Then when you lay your next color down... it just kind of lays there and says...."now warm me just a little". Lol.
I turn my iron way down to the lowest setting. This is just enough heat....not hot per say, but hot enough to activate the adhesive enough to get the layer to stay put. Then with iron in one hand and my free hand to carefully caress the next layer...I just smooth it into place then use my warm iron to heat the covering to activate the adhesive.
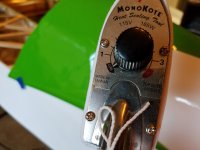
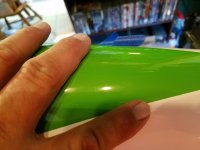
Working from the center towards the edges, smooth careful strokes. Back and forth, Up and down, back and forth, etc. I have found however that when you start reaching the opposite edge of the one you started from it takes a little more patience to keep from "skewing" the covering. But again, this is why I keep the iron very low heat.
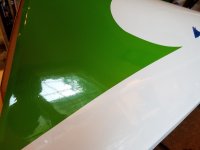
Once you have sealed down the entire section... go back over the entire layer. Don't increase your heat...just continue with the same back and forth paths as before. However make your paths slower so that more heat.... (same low setting) is transferred through the covering to get the adhesive to really "glue" down. You will know if you are going too slow. You will start getting tiny blisters. What I do then is bump the heat up a single notch or two and seal the edges. The key factor is to "NOT" allow your iron to get too hot. The excessive heat will prompt the upper layer of covering to shrink and you really don't want it to. Not yet. Also, too much heat....(iron too hot) will cause the gasses in the adhesive to expand and this is what causes those nasty little air bubbles and larger pockets. Too little heat and the upper layer will not seal or stay down. Too much heat and your covering will get too hot, creating bubbles and shrinkage. It really is a very fine line. But practicing will pay off in the long run.
I intentionally left the corner just below the canopy unsealed down. I will need this corner to lay over the top fuse side where they join. Do I ever get any bubbles or gas pockets? Yes, actually I do on an occasion. But usually because I get in too big of a hurry.
As for after the fact of covering? We have all been there. Our prized build is out in the summer sun and what the "H", "E" double tooth picks is this crap? It happens. But.... it is not difficult to address. Remedy is simple. Fly the snot outta that plane and have fun. When you get home....allow your covering to cool. It is also very important that the airframe is cooled down too. There will be residual heat in the wood that will throw you for a loop if you don't allow the entire airframe to cool. Room temperature is best. With your heat gun in hand.... (And this also takes practice) Turn it on and make semi slow paths across your affected area. Wing with a sag, fuse with a wrinkle. Just enough heat to allow the covering to absorb the heat. Once it does this it will want to "retract" to a smaller than its original size. When it does this, the wrinkle, sag, or bubble will want to shrink right down. I should mention that Ultra is very forgiving. But it too has its tolerances. There comes a point that not even Ultracate will shrink down after a while. And seam lines can be a pain too. Remember to "NOT" allow too much sudden heat. Those damn seems will pull away. This is one advantage that Monokote has over Ultracoat. Monokote seems to really seal down well when it comes to seams. But the Top Flite Trim Solvent is awesome for making "ANY" covering seam stay put.
Now Kelly, why does it take so long? Easy peasy to answer. You can't rush perfection. LOL. Honestly I don't know. But I do know the wait is usually worth it. As for flying this before you get your fuse? Ha, I would not place a bet on that pal. LOL
I hope this helps some of you and also helps eliminate some of the mystery behind getting not just a "good" covering job. But a "great" covering job that you can be very proud of.
Last edited:
Snoopy1
640cc Uber Pimp
Thanks guys. It is coming along.., not real quick, but steady all the same. To answer your questions on how "I" do it, is not a problem. I probably defer from the way others do it. But I have found that I have my own method and it works for me. I'll try to explain my approach and what I do "after" the fact of covering.
I really like Ultracoat much better than Monokote for a variety of reasons. Back in the day, Mono is all my son and I used. I guess it was because it is what pretty much everyone used. And well, it was there. So... yeah. Fast forward however, when I started really working with the Ultra, I found it to be so much more forgiving than Mono. Then of course they went and changed the adhesive formula and that really messed me up. I find that Ultra goes around compound corners much better and you can warm it to give you an almost "stretchable" material to work with. Which for me, makes things so much easier. Another thing I like is the fact that when applied correctly, you don't have to pull your corners taught and then seal it down as it seems to be with Mono. You can just start in the middle and work it out to your edges, seal it down....trim it off and shrink it. Putting one color over another is actually pretty easy for me. I know some guys use the one or two drops of dish soap in the water trick. Some even use the Windex. I can't say I like either method. Biggest thing to remember when putting Ultra over Ultra... make sure your "base" color is down good and stretched. No sags, no wrinkles, no creases. Then when you lay your next color down... it just kind of lays there and says...."now warm me just a little". Lol.
I turn my iron way down to the lowest setting. This is just enough heat....not hot per say, but hot enough to activate the adhesive enough to get the layer to stay put. Then with iron in one hand and my free hand to carefully caress the next layer...I just smooth it into place then use my warm iron to heat the covering to activate the adhesive.
View attachment 103429 View attachment 103430
Working from the center towards the edges, smooth careful strokes. Back and forth, Up and down, back and forth, etc. I have found however that when you start reaching the opposite edge of the one you started from it takes a little more patience to keep from "skewing" the covering. But again, this is why I keep the iron very low heat.
View attachment 103431
Once you have sealed down the entire section... go back over the entire layer. Don't increase your heat...just continue with the same back and forth paths as before. However make your paths slower so that more heat.... (same low setting) is transferred through the covering to get the adhesive to really "glue" down. You will know if you are going too slow. You will start getting tiny blisters. What I do then is bump the heat up a single notch or two and seal the edges. The key factor is to "NOT" allow your iron to get too hot. The excessive heat will prompt the upper layer of covering to shrink and you really don't want it to. Not yet. Also, too much heat....(iron too hot) will cause the gasses in the adhesive to expand and this is what causes those nasty little air bubbles and larger pockets. Too little heat and the upper layer will not seal or stay down. Too much heat and your covering will get too hot, creating bubbles and shrinkage. It really is a very fine line. But practicing will pay off in the long run.
View attachment 103432 View attachment 103433
I intentionally left the corner just below the canopy unsealed down. I will need this corner to lay over the top fuse side where they join. Do I ever get any bubbles or gas pockets? Yes, actually I do on an occasion. But usually because I get in too big of a hurry.
As for after the fact of covering? We have all been there. Our prized build is out in the summer sun and what the "H", "E" double tooth picks is this crap? It happens. But.... it is not difficult to address. Remedy is simple. Fly the snot outta that plane and have fun. When you get home....allow your covering to cool. It is also very important that the airframe is cooled down too. There will be residual heat in the wood that will throw you for a loop if you don't allow the entire airframe to cool. Room temperature is best. With your heat gun in hand.... (And this also takes practice) Turn it on and make semi slow paths across your affected area. Wing with a sag, fuse with a wrinkle. Just enough heat to allow the covering to absorb the heat. Once it does this it will want to "retract" to a smaller than its original size. When it does this, the wrinkle, sag, or bubble will want to shrink right down. I should mention that Ultra is very forgiving. But it too has its tolerances. There comes a point that not even Ultracate will shrink down after a while. And seam lines can be a pain too. Remember to "NOT" allow too much sudden heat. Those damn seems will pull away. This is one advantage that Monokote has over Ultracoat. Monokote seems to really seal down well when it comes to seams. But the Top Flite Trim Solvent is awesome for making "ANY" covering seam stay put.
Now Kelly, why does it take so long? Easy peasy to answer. You can't rush perfection. LOL. Honestly I don't know. But I do know the wait is usually worth it. As for flying this before you get your fuse? Ha, I would not place a bet on that pal. LOL
I hope this helps some of you and also helps eliminate some of the mystery behind getting not just a "good" covering job. But a "great" covering job that you can be very proud of.
Thanks for taking the time to explain the procedure. Hope to remember all the fine points the next time I need to cover a plane.
stangflyer
I like 'em "BIG"!
No problem. I hope it helps.Thanks for taking the time to explain the procedure. Hope to remember all the fine points the next time I need to cover a plane.
Snoopy1
640cc Uber Pimp
Time to go to bed.Thanks guys. It is coming along.., not real quick, but steady all the same. To answer your questions on how "I" do it, is not a problem. I probably defer from the way others do it. But I have found that I have my own method and it works for me. I'll try to explain my approach and what I do "after" the fact of covering.
I really like Ultracoat much better than Monokote for a variety of reasons. Back in the day, Mono is all my son and I used. I guess it was because it is what pretty much everyone used. And well, it was there. So... yeah. Fast forward however, when I started really working with the Ultra, I found it to be so much more forgiving than Mono. Then of course they went and changed the adhesive formula and that really messed me up. I find that Ultra goes around compound corners much better and you can warm it to give you an almost "stretchable" material to work with. Which for me, makes things so much easier. Another thing I like is the fact that when applied correctly, you don't have to pull your corners taught and then seal it down as it seems to be with Mono. You can just start in the middle and work it out to your edges, seal it down....trim it off and shrink it. Putting one color over another is actually pretty easy for me. I know some guys use the one or two drops of dish soap in the water trick. Some even use the Windex. I can't say I like either method. Biggest thing to remember when putting Ultra over Ultra... make sure your "base" color is down good and stretched. No sags, no wrinkles, no creases. Then when you lay your next color down... it just kind of lays there and says...."now warm me just a little". Lol.
I turn my iron way down to the lowest setting. This is just enough heat....not hot per say, but hot enough to activate the adhesive enough to get the layer to stay put. Then with iron in one hand and my free hand to carefully caress the next layer...I just smooth it into place then use my warm iron to heat the covering to activate the adhesive.
View attachment 103429 View attachment 103430
Working from the center towards the edges, smooth careful strokes. Back and forth, Up and down, back and forth, etc. I have found however that when you start reaching the opposite edge of the one you started from it takes a little more patience to keep from "skewing" the covering. But again, this is why I keep the iron very low heat.
View attachment 103431
Once you have sealed down the entire section... go back over the entire layer. Don't increase your heat...just continue with the same back and forth paths as before. However make your paths slower so that more heat.... (same low setting) is transferred through the covering to get the adhesive to really "glue" down. You will know if you are going too slow. You will start getting tiny blisters. What I do then is bump the heat up a single notch or two and seal the edges. The key factor is to "NOT" allow your iron to get too hot. The excessive heat will prompt the upper layer of covering to shrink and you really don't want it to. Not yet. Also, too much heat....(iron too hot) will cause the gasses in the adhesive to expand and this is what causes those nasty little air bubbles and larger pockets. Too little heat and the upper layer will not seal or stay down. Too much heat and your covering will get too hot, creating bubbles and shrinkage. It really is a very fine line. But practicing will pay off in the long run.
View attachment 103432 View attachment 103433
I intentionally left the corner just below the canopy unsealed down. I will need this corner to lay over the top fuse side where they join. Do I ever get any bubbles or gas pockets? Yes, actually I do on an occasion. But usually because I get in too big of a hurry.
As for after the fact of covering? We have all been there. Our prized build is out in the summer sun and what the "H", "E" double tooth picks is this crap? It happens. But.... it is not difficult to address. Remedy is simple. Fly the snot outta that plane and have fun. When you get home....allow your covering to cool. It is also very important that the airframe is cooled down too. There will be residual heat in the wood that will throw you for a loop if you don't allow the entire airframe to cool. Room temperature is best. With your heat gun in hand.... (And this also takes practice) Turn it on and make semi slow paths across your affected area. Wing with a sag, fuse with a wrinkle. Just enough heat to allow the covering to absorb the heat. Once it does this it will want to "retract" to a smaller than its original size. When it does this, the wrinkle, sag, or bubble will want to shrink right down. I should mention that Ultra is very forgiving. But it too has its tolerances. There comes a point that not even Ultracate will shrink down after a while. And seam lines can be a pain too. Remember to "NOT" allow too much sudden heat. Those damn seems will pull away. This is one advantage that Monokote has over Ultracoat. Monokote seems to really seal down well when it comes to seams. But the Top Flite Trim Solvent is awesome for making "ANY" covering seam stay put.
Now Kelly, why does it take so long? Easy peasy to answer. You can't rush perfection. LOL. Honestly I don't know. But I do know the wait is usually worth it. As for flying this before you get your fuse? Ha, I would not place a bet on that pal. LOL
I hope this helps some of you and also helps eliminate some of the mystery behind getting not just a "good" covering job. But a "great" covering job that you can be very proud of.
stangflyer
I like 'em "BIG"!
A bit more covering on the big 330 tonight. Alas, I just don't have enough steam, (or time) to get the upper and lower green covering on the fuse tonight. But I did get the left side vertical fin...
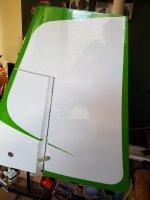
And I managed to get the black stripe layed down...
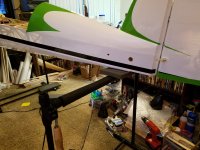
Tomorrow I will try really hard to get the upper and lower green covering placed and sealed down. Won't be long and the fuse will be done. I need to start thinking about graphics. I know what I see in my head. But as we've all discovered before, what I see in my head may not necessarily reflect the exact "look" I am wanting to achieve. Time will tell.
I also contacted Wingswest rc regarding my paint for this bird. They are always so helpful and very quick to respond. And talk about focused on their customers wants... wow. Both colors, primer and two stage clear coat already mixed and in stock. Paid for last night and was sent the tracking number this morning. Thats quick my friends. Yes, as before the paint is still a little pricey. However if it matches the covering as well as the paint for the Jtec Pitts, then I am sure it will be worth it. And i am certain it will look great.
More tomorrow fellas.

And I managed to get the black stripe layed down...

Tomorrow I will try really hard to get the upper and lower green covering placed and sealed down. Won't be long and the fuse will be done. I need to start thinking about graphics. I know what I see in my head. But as we've all discovered before, what I see in my head may not necessarily reflect the exact "look" I am wanting to achieve. Time will tell.
I also contacted Wingswest rc regarding my paint for this bird. They are always so helpful and very quick to respond. And talk about focused on their customers wants... wow. Both colors, primer and two stage clear coat already mixed and in stock. Paid for last night and was sent the tracking number this morning. Thats quick my friends. Yes, as before the paint is still a little pricey. However if it matches the covering as well as the paint for the Jtec Pitts, then I am sure it will be worth it. And i am certain it will look great.
More tomorrow fellas.
Snoopy1
640cc Uber Pimp
Yes I have used their paint it is great stuff and the colour match was perfect, the only thing with me the primer was bad something wrong with paint or the can but the rest was excellent.
Well I have to say looking good a again. One question doing all those fancy cut in the green must really eat up a lot of covering or do you have secret on how you work around it.
Well I have to say looking good a again. One question doing all those fancy cut in the green must really eat up a lot of covering or do you have secret on how you work around it.
stangflyer
I like 'em "BIG"!
Well thank you very much. I do appreciate the compliment. Do I have a secret? Why, yes I do! As a matter of fact, it is actually quite simple.Yes I have used their paint it is great stuff and the colour match was perfect, the only thing with me the primer was bad something wrong with paint or the can but the rest was excellent.
Well I have to say looking good a again. One question doing all those fancy cut in the green must really eat up a lot of covering or do you have secret on how you work around it.
Tony Tan
pilot-rc@139.com

