• If you are new to GiantScaleNews.com, please register, introduce yourself, and make yourself at home.

    We're 1st in Giant Scale RC because we've got the best membership on the internet! Take a look around and don't forget to register to get all of the benefits of GSN membership!

    Welcome!

3D Viper ST build continued part 2

tylerzx9r

100cc
Good news, good news! I actually got an opportunity to work on my Viper this last evening! After going through a rough battle over my partnership( getting screwed) I have left there with no debt owed, and little buy out cash to show for all my hard work! I will say I'm ok with the outcome because I owe nothing, just have to pick myself up and keep moving forward! After all that has happened and no energy or will to work on stuff, stress relieved, I had an opportunity and the drive to get some work done! So here we go!
 

tylerzx9r

100cc
I had to regroup to where I left off which was around the canopy and hatch area, so I dry fit the canopy on the hatch and trimmed up a little side area, then took some 80 grit sand paper and sanded the front edge to accept my fillet after I glue it on. After sanding I will smoke the canopy before gluing it onto the hatch!
 

Attachments

  • image.jpg
    image.jpg
    39 KB · Views: 312

tylerzx9r

100cc
image.jpg image.jpg image.jpg So after sanding, and be along the front edge, I masked it all up, cleaned it off and tinted the inside with some tinted automotive clear. I sprayed two coats on to get the desired darkness I wanted.
 

Attachments

  • image.jpg
    image.jpg
    30.8 KB · Views: 329

tylerzx9r

100cc
image.jpg image.jpg 
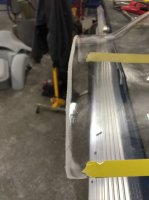
After making sure the clear had dried completely for 24 hours, I refit the canopy to the hatch, and prepped the hatch for gluing the canopy on. Using welders adhesive, I applied a small bead all around the hatch, set the canopy in place, and used masking tape to hold it into position while it dries.
 

tylerzx9r

100cc
As you may be able to see in one of the photos, I punctured the belly pan on accident and created a small whole, I fit the foam pcs. back together and will use foam safe ca to hold in place. After that I'll have to cut some of the damaged balsa away and patch it with a new piece. Then I'll have to block sand the surface smooth again before covering.
 

tylerzx9r

100cc
I have also temporarily bolted the engine in place to fit and set the wholes in the cowling. I will now drill all of the wholes for my 4-40 screws, and set my assembly tabs inside for gluing into place.
 

Attachments

  • image.jpg
    image.jpg
    42.4 KB · Views: 328

tylerzx9r

100cc
So I couldn't get a ton accomplished today, but I managed to final fit the cowl halves for marking and drilling my wholes for the screws to hold the halves together at the seam.
 

Attachments

  • image.jpg
    image.jpg
    47.9 KB · Views: 311
  • image.jpg
    image.jpg
    44.6 KB · Views: 304

sweetpea

100cc
When I built my Edge (years ago)......I inset my canopy into the turtle deck and the back side. This way the canopy was flush. That was a PITA to get everything smooth but it looked great.
 
Top