You are using an out of date browser. It may not display this or other websites correctly.
You should upgrade or use an alternative browser.
You should upgrade or use an alternative browser.
The 'What did you do in your workshop tonight?' thread
- Thread starter Xpress
- Start date
Bunky.F.Knuckle
150cc
Ok started covering the ViperSt. This is my first plane that I am covering that has styrofoam wings and stabilizer. It sure covers differently. The covering does not want stick down. Get all the edges nicely brown no wrinkles etc, but the centre I keep going over the hot bubble with a hot iron and it just stays there. It goes brown when I take the iron off but that section is not glued down. I guess I will have to prick it a few times to release the air and iron it down.
Does anyone one have any suggestions.
Lay your piece down, and work from the center outwards.
I like to run lengthwise on a fully sheeted surface, then work the leading edge, then ghe trailing edge. I dont pull the covering tight, by hand. I just pull it taught, then iron it down. With that method, I have yet to get a bubble or wrinkle on anything.
ericrs
70cc twin V2
Doing great! I haven't been able to paint yet@ericrs hi Erich's how are you doing. You used the paint from "West Wings." How many spray cans did it take. To paint the cowl. Is one enough or do you need two. Can you give a brief run down how it went and if have any pointers. Thanks.
 I have got real busy with work and just haven't had the time to paint. I didn't get the spray cans, I have a HVLP setup anyway. It kinda depends on how many colors you have in your scheme, but you will probly need two to do the cowl. Are you painting your hatch? If so than you will need more for that, and any other colors that are in your scheme would be on top of that. The guys at Wings West can give you a real good idea on how much it will take. I got three spray cans of clear from him to do my cowl and hatch,but those are also larger.
 I have been working on my Viper still little bits here and there. I have been stuffing the fuse with the electronics.
I had a box show up today with some goodies from @Vern.Smith at White Rose Engineering!
 Awesome stuff!
Attachments
Snoopy1
640cc Uber Pimp
Doing great! I haven't been able to paint yet
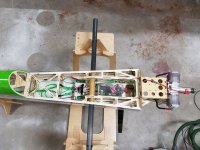
I have been working on my Viper still little bits here and there. I have been stuffing the fuse with the electronics.
I had a box show up today with some goodies from @Vern.Smith at White Rose Engineering!
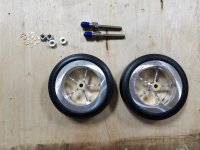
Hi there, man I thought you were done and flying the plane. At least it is covered. Looks like all you need to do assembly the plane do the radio and it is ready to fly. Is the weather where your good enough to fly at this time of the year or will you be waiting for the spring. Wheels look great I will be getting the same ones what size did you get.
You need a new bos sounds like you are being overworked, tel him you have a plane to finish and fly.
Last edited:
ericrs
70cc twin V2
Today it is snowing and blowing about 30mph and it's about 5 degrees F out, so not good flying weather lol. I got 4.5" wheels.Hi there, man I thought you were done and flying the plane. At least it is covered. Looks like all you need to do assembly the plane do the radio and it is ready to fly. Is the weather where your good enough to fly at this time of the year or will you be waiting for the spring. Wheels look great I will be getting the same ones what size did you get.
Snoopy1
640cc Uber Pimp
Will try that thanks. It seems you need a little different technique to cover foam wings than you do open balsa structure. Thanks for the advice.Lay your piece down, and work from the center outwards.
I like to run lengthwise on a fully sheeted surface, then work the leading edge, then ghe trailing edge. I dont pull the covering tight, by hand. I just pull it taught, then iron it down. With that method, I have yet to get a bubble or wrinkle on anything.
Buddy5303
70cc twin V2
If it is 120 I do not think so but if 100 you may at our field we have a person running around with sound meter which we all would like to kill but it seems the 100's are passing but 120 are just to load.
I may be wrong but you put all the good Viton tubing on the out side but if I am not mistaken it looks like you still have blue Tyson on the insides. Why would you not put it on the inside of the tank is it not more important to have it on the inside.
It is a 100 going to turning a 26 x 12 3 blade propeller. It's all Tyron tubing just wrapped with a exspandable sleeve. The blue in the tank are hard lines just vent and fill line. Clunk is also on tygon. That is a stock fortitude tank.
Sent from my iPhone using Tapatalk
Bunky.F.Knuckle
150cc
Will try that thanks. It seems you need a little different technique to cover foam wings than you do open balsa structure. Thanks for the advice.
Some would say yes, and some would say no. Covering technique is all the same, but how and where you start is a bit different.
Like you have seen, if you seal all the edges, you have nowhere for the gases to escape from, leaving you a huge gas pocket between the surface and covering. I have used an xacto knife to poke a hole in the covering, if/when I get a stubborn bubble, and cant get it to work out.
I have covered so many solid surfaces, I forget sometimes how to cover an open bay surface.
Billy J
50cc
Use 11 razor. Pull covering off apply a coat of stix itYou need to have a pin in-hand and poke a couple small holes in the covering wherever you see bubbles start to form when heating. Use a heat gun or iron (I use both depending where I am at) and put a pin hole in the bubble(s) and work the air towards the holes. The holes won't show up in the covering. I also use a soft mitt to go over the covering as it cools to ensure the adhesive adheres to the wood. Once you start, it will become second nature. Edit (I just use a small t-pin to poke the holes).


