• If you are new to GiantScaleNews.com, please register, introduce yourself, and make yourself at home.

    We're 1st in Giant Scale RC because we've got the best membership on the internet! Take a look around and don't forget to register to get all of the benefits of GSN membership!

    Welcome!

3D Viper-ST 100-120cc scratch build......it continues!

Terryscustom

640cc Uber Pimp
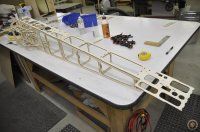
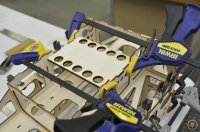
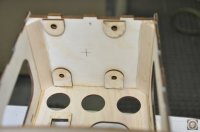
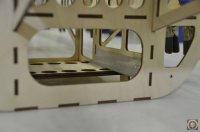
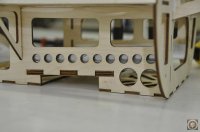
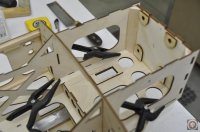
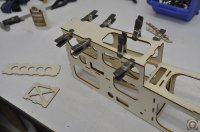
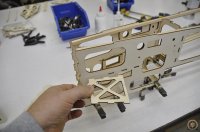
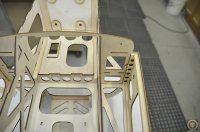
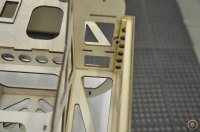
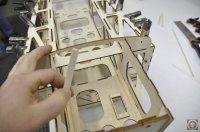
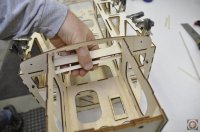
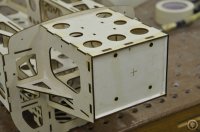
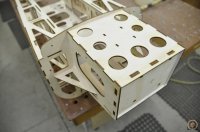
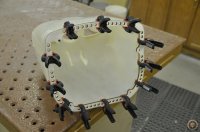
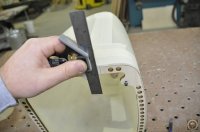
Next, test fit the fuse side assemblies and ensure that all areas fit snug and tight. If there is something that does not fit correctly due to glue squeeze out etc. it is important to fix that at this time.

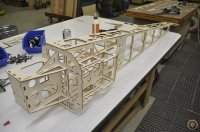
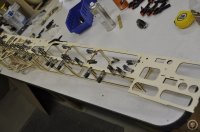
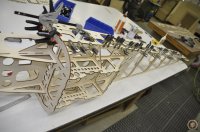
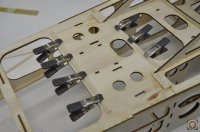
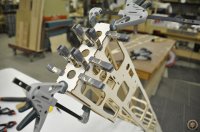
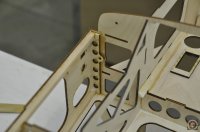
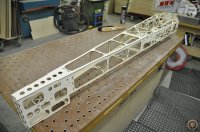
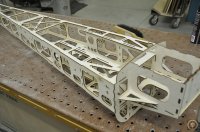
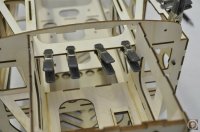
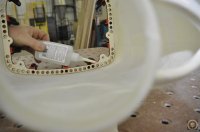
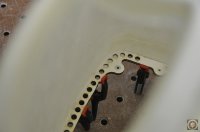
When satisfied, glue the fuse sides in place with wood glue. On this build I used wood glue on the longeron, clamped that portion in place, then glued all formers to the side one at a time with medium CA applied on both sides of the former. Again, no kicker was used.
_DSC0122.JPG
 

Attachments

  • _DSC0118.JPG
    _DSC0118.JPG
    112.6 KB · Views: 277
  • _DSC0119.JPG
    _DSC0119.JPG
    112.3 KB · Views: 317
  • _DSC0120.JPG
    _DSC0120.JPG
    87.4 KB · Views: 289
  • _DSC0121.JPG
    _DSC0121.JPG
    110.1 KB · Views: 286

Terryscustom

640cc Uber Pimp
Carefully install the landing gear plate with wood glue but remove ALL glue squeeze out on top and outsides so it will not interfere with the aluminum angle on top. Once that is in place, the vented plates can be installed in front and in back of the landing gear plate.

When glue is dried I hardened these tabs with thin CA. Then cut some 1/2" basswood tri-stock to fit the back side of the firewall as shown. Keep them short enough to fit under the engine box top.

Locate the included aluminum angle gear braces. Rough up the outside of these with 100 or 80 grit sandpaper. Install the aluminum angle brackets and firewall tri stock with epoxy.

_DSC0125.JPG
 

Attachments

  • _DSC0123.JPG
    _DSC0123.JPG
    98.9 KB · Views: 280
  • _DSC0124.JPG
    _DSC0124.JPG
    43.4 KB · Views: 288
  • _DSC0126.JPG
    _DSC0126.JPG
    59.7 KB · Views: 277
  • _DSC0127.JPG
    _DSC0127.JPG
    54.2 KB · Views: 268
  • _DSC0128.JPG
    _DSC0128.JPG
    123.4 KB · Views: 312
  • _DSC0129.JPG
    _DSC0129.JPG
    54.6 KB · Views: 265
  • _DSC0130.JPG
    _DSC0130.JPG
    47.6 KB · Views: 286
  • _DSC0131.JPG
    _DSC0131.JPG
    62 KB · Views: 282
Last edited:

Terryscustom

640cc Uber Pimp
Amazing 3 more kits cut and this one is almost framed up, and I'm still building a 40 size profile.

Terry is not human, at least I don't think

Thanks guy's. Sorry for all the "instructional" posts but there are a couple guy's that are looking for kits of this and this will give them a place to come check out the "how to's". Very simple really. Few more posts and the fuse is done:
 

Terryscustom

640cc Uber Pimp
Next I added some tri-stock to the bottom of the engine box and a couple of pieces on the bottom side of the receiver and battery tray. Glue these with wood glue or epoxy only!

Then I assembled the tail section as shown and in the order shown:
 

Attachments

  • _DSC0132.JPG
    _DSC0132.JPG
    78.3 KB · Views: 286
  • _DSC0133.JPG
    _DSC0133.JPG
    78.9 KB · Views: 282
  • _DSC0134.JPG
    _DSC0134.JPG
    86.9 KB · Views: 280
  • _DSC0135.JPG
    _DSC0135.JPG
    72.3 KB · Views: 287
  • _DSC0136.JPG
    _DSC0136.JPG
    73.2 KB · Views: 280
  • _DSC0137.JPG
    _DSC0137.JPG
    69.2 KB · Views: 297
  • _DSC0138.JPG
    _DSC0138.JPG
    75.6 KB · Views: 287
  • _DSC0139.JPG
    _DSC0139.JPG
    89.2 KB · Views: 285

Terryscustom

640cc Uber Pimp
Test fit and install the fillers behind F-1 that also hold the blind nuts for the cowl. Use good quality blind nuts, not the el-cheapo's from the hobby store. I recommend RTL fasteners or McMaster Carr. Install blind nuts on the back side of F-1 for the bottom four bolts. Install the top two on the inside of the upper two cowl ring holes.

Next test fit and install the fuse upper plate. Wood glue should be used on the longerons and either wood glue or medium CA on the rest AFTER the top plate is installed. Start at the front and pull the front two tabs into place and work your way back towards the tail while clamping. If you are using medium CA on the formers of the top plate, glue on the UNDER SIDE, NOT the top and chase each glue joint with microballons. This makes an extremely strong structure. Once everything is dry it never hurts to put a little thing CA into all the tabs like you would on an ARF build. Do not use kicker on any CA joints. Either microballoons or wait for drying on all these joints.

Lastly add one pc. of try stock to the under side of the front of the top plate and install the engine box top. Tri-stock on the under side of the top is optional.
 

Attachments

  • _DSC0140.JPG
    _DSC0140.JPG
    66.1 KB · Views: 319
  • _DSC0141.JPG
    _DSC0141.JPG
    79.2 KB · Views: 307
  • _DSC0142.JPG
    _DSC0142.JPG
    67.9 KB · Views: 283
  • _DSC0143.JPG
    _DSC0143.JPG
    71.2 KB · Views: 286
  • _DSC0144.JPG
    _DSC0144.JPG
    67 KB · Views: 290
  • _DSC0145.JPG
    _DSC0145.JPG
    70 KB · Views: 299
  • _DSC0146.JPG
    _DSC0146.JPG
    118.8 KB · Views: 300
  • _DSC0147.JPG
    _DSC0147.JPG
    129.4 KB · Views: 266
  • _DSC0148.JPG
    _DSC0148.JPG
    122.2 KB · Views: 296
  • _DSC0149.JPG
    _DSC0149.JPG
    112.6 KB · Views: 270
  • _DSC0150.JPG
    _DSC0150.JPG
    80.7 KB · Views: 323
  • _DSC0151.JPG
    _DSC0151.JPG
    85.3 KB · Views: 274
  • _DSC0152.JPG
    _DSC0152.JPG
    79.3 KB · Views: 294
  • _DSC0161.JPG
    _DSC0161.JPG
    77.8 KB · Views: 280
  • _DSC0162.JPG
    _DSC0162.JPG
    73.8 KB · Views: 302

Dooinit

70cc twin V2
Thanks guy's. Sorry for all the "instructional" posts but there are a couple guy's that are looking for kits of this and this will give them a place to come check out the "how to's". Very simple really. Few more posts and the fuse is done:
Don't apologize for the "instructional" posts my friend. You build threads are top notch. Thanks for taking the time to show new builders, like myself, the way!
 

Terryscustom

640cc Uber Pimp
There are two more items to install on the fuselage and I will do that tomorrow. I wanted to make sure I got the engine and cowl test fit tonight in case there are any changes needed (plus I was just a little excited to see it on there).

For cowl installation:
- First I mounted the engine and removed the mufflers.
- Tape the cowl halves together and fit the cowl against F-1 to check the alignment with the engine.
- Sand the back of the cowl accordingly until the spinner lines up like you want it with the back of the spinner. The mounting holes and thrust angle are correct so if it is off make sure you adjust the back of the cowl.
- Next clamp the cowl ring in inside the cowl. Tack it in place with medium CA but STAY AT LEAST 1" AWAY FROM THE COWL SPLIT LINE!! You don't want to accidently glue the cowl halves together.
- After it is tacked, draw a line and use a razor saw to split the cowl ring. Apply another bead of medium CA with microballoons to form a fillet. We will go over this with a large bead of "Goop" later which will ultimately keep the ring in place and hold up to vibration, etc.
 

Attachments

  • _DSC0154.JPG
    _DSC0154.JPG
    54.4 KB · Views: 284
  • _DSC0167.JPG
    _DSC0167.JPG
    64.5 KB · Views: 272
  • _DSC0168.JPG
    _DSC0168.JPG
    54.6 KB · Views: 284
  • _DSC0153.JPG
    _DSC0153.JPG
    68.1 KB · Views: 279
  • _DSC0155.JPG
    _DSC0155.JPG
    82.7 KB · Views: 258
  • _DSC0156.JPG
    _DSC0156.JPG
    61.5 KB · Views: 265
  • _DSC0157.JPG
    _DSC0157.JPG
    45.5 KB · Views: 279
  • _DSC0158.JPG
    _DSC0158.JPG
    64.1 KB · Views: 258
  • _DSC0159.JPG
    _DSC0159.JPG
    89 KB · Views: 275
  • _DSC0160.JPG
    _DSC0160.JPG
    82.3 KB · Views: 263
Last edited:

Terryscustom

640cc Uber Pimp
Next I installed the mufflers, cut the cowl for the mufflers and installed for a final test run. PLENTY of room for plug caps, Jtec "slick" compacts also fit nicely. I'm not 100% sure the DLE120 stock mufflers will fit because they make them extremely long and pointy at the top. They would be extremely close but may fit. I plan to install a DLE120 in another one and will post those findings later this Winter, however I've not been extremely happy with the quality of the stock mufflers on the DLE. I may see if Jtec has an option for them.
_DSC0170.JPG


Couple more small parts to install in the fuselage and it is DONE. Time to call it a day.
 

Attachments

  • _DSC0163.JPG
    _DSC0163.JPG
    92.6 KB · Views: 284
  • _DSC0164.JPG
    _DSC0164.JPG
    71.8 KB · Views: 273
  • _DSC0165.JPG
    _DSC0165.JPG
    94.7 KB · Views: 285
  • _DSC0166.JPG
    _DSC0166.JPG
    60.1 KB · Views: 253
  • _DSC0169.JPG
    _DSC0169.JPG
    66.1 KB · Views: 242
  • _DSC0171.JPG
    _DSC0171.JPG
    54.3 KB · Views: 258
  • _DSC0172.JPG
    _DSC0172.JPG
    61.1 KB · Views: 268
  • _DSC0173.JPG
    _DSC0173.JPG
    64.3 KB · Views: 260
  • _DSC0174.JPG
    _DSC0174.JPG
    87.2 KB · Views: 270
Top